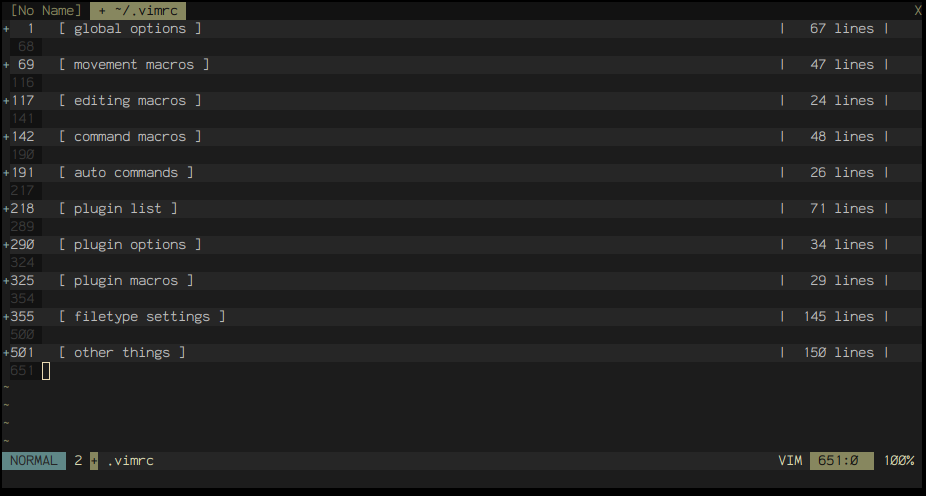
Automatic vim folds for config files
Vim folds are neat. You can toggle them open/closed quickly with za (which I remapped to space),
but creating/deleting them is kind of awkward with zf/zd and most of all making vim
remember where your folds were is a bit of a pain.
But luckily there is a way to define folds through comments in the source code, which is really as cool as it sounds.
It is particularly comfortable to use in config files, that sometimes get a bit too long, and organising stuff into groups can save you some headaches.
Example of my .vimrc as soon as I open it with vim:

I set it up in a way that defining folds is done through marks, but since I hated vim’s default {{{ marks, I defined
my own set of them, that work like this:
#    === Fold-title 1 ===
yada yada yada
#    ==== Sub-fold ====
#    ===== Sub-Sub-fold =====
hello
#    =====
#    ====
#    ===
Result:

Nice, how does it work?
A top-level fold is started by the === <title> === mark anywhere on the line (it doesn’t matter what character you use to
define the comment, so this works nicely with almost every config file), and is ended by a === mark, anywhere on any next line.
A one-level deep fold is started by writing ==== <title> ==== anywhere on a line, and ended by ==== on any of the following lines.
The more ‘equal’ sings you add, the deeper the fold will be.
Folds will be created as soon as you save and reload the file.
You do not need to edit your .vimrc to achieve this, you just need to put the following at the end of the config file you want to auto-fold:
"" vim:fdm=expr:fdl=0
"" vim:fde=getline(v\:lnum)=~'===*$'?(getline(v\:lnum)=~'==\\+[^=]\\+==.*'?'>'\:'<').(strlen(matchstr(getline(v\:lnum),'==*$'))-2)\:'='
(I start the lines with the " because I’m using this for my .vimrc; you can use whatever comment character you want to start those lines)
Beware, if you go on, this will involve some hardcore vim-fu to understand - but you don’t really need to, you can just copy paste this obscenity and go on with your life.
Ok, so, what the hell is this mess?
Basically, we are dynamically setting vim options when we open a file that contains lines starting with vim: at its end.
It’s a feature called modelines, you can read about it with :help modeline.
The syntax is vim:<option>=<value>:<option>:<value>. It basically emulates a :set command.
So, for example, if I don’t want vim to autoindent when I’m editing my .bashrc, I just need to put
# vim:noautoindent at the end of it.
Note: It is not strictly necessary to put the modeline at the end of the file, but please do it, for your own sanity. Note: If modelines don’t work for you be sure that you don’t have modelines=off in your .vimrc
With the two modelines above we are setting the options:
fdm, short forfoldmethod, and we set it toexpr, meaning that vim must define folds based on an “expression” we will givefdl, short forfoldlevel, and we set it to 0, so that when we open the file, all folds will be closed.fde, short forfoldexpr, and we set it to a vimscript (I know, I’m sorry) function that will be evaluated on every line. This function can return the following values:0,1,n: this line is in a fold deep0,1ornlevels=: this line is in a fold as deep as the previous line>1,>2,>n: a fold of level1,2ornstarts at this line<1,<2,<n: a fold of level1,2ornends at this line (have a more in depth look with:help fold*expr)
Now, I won’t go into detail about what that vim:fde line does (tbh I wrote it months ago and I don’t have the slightest idea of how it works anymore),
but, to not scare you too much, I will list you the vimscript operators I used:
getline(v\:lnum): returns the current line being evaluated as a string.- operator
=~: much like bash, returns true when used in syntax<string>=~<regex>and the string matches the regex. matchstr(<string>, <regex>): returns only the part of the string that matches the regex- operator
?: ternary operator, works exactly like in C and many other languages
Neat! Now you can define your own set of marks and overly complicated folding logic.
But wait, my folds are a bit uglier than yours
I know, you don’t really get results like in the first screenshot; normal vim folds are somewhat uglier - to fix this,
we need a custom fold drawing function.
You just need to write your own vimscript function, and then set foldtext=<yourfunction>.
Here is mine, I forked it from somewhere, but don’t remember precisely. I am not going to explain this one - sorry,
you are on your own with this bad boy - but you can copy it too if you want, it works well with === markers.
function! NeatFoldText()
	let line = ' '.substitute(getline(v:foldstart), '["#\/%!]*\s\+=\+\s*', '','g').' '
	let line = repeat('[', v:foldlevel) . line . repeat(']', v:foldlevel)
	let lines_count = v:foldend - v:foldstart + 1
	let lines_count_text = '| ' . printf("%10s", lines_count . ' lines') . ' |'
	let foldtextstart = strpart(repeat('  ',v:foldlevel) . line , 0, (winwidth(0)*2)/3)
	let foldtextend = lines_count_text . repeat(' ', 8)
	let foldtextlength = strlen(foldtextstart . foldtextend) + &foldcolumn
	return foldtextstart . repeat(' ', winwidth(0)-foldtextlength) . foldtextend
endfunction

set foldtext=NeatFoldText()